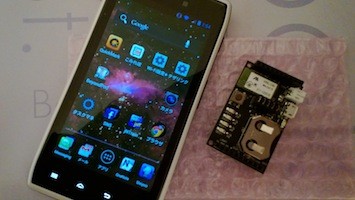
Motorola RAZR IS11MでBluetooth LEが使えた

先日 Motorola RAZR IS12MでBluetooth LEを使おうとしてる - backyard of 伊勢的新常識 でやってた Motorola RAZR + Motorola BLE API で konashi を使おうとしてた件、一応値がとれるようになったので、軽く方法を紹介します。
プロジェクトの作成
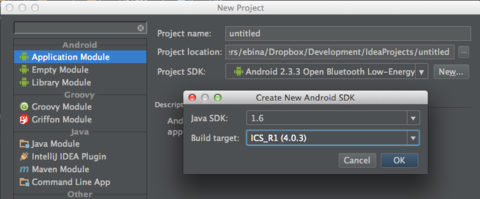
前回エントリで書いてたように、SDKの中から jar を引っ張ってきて突っ込むのではなく、Add-on SDK でプロジェクトを新規作成します。

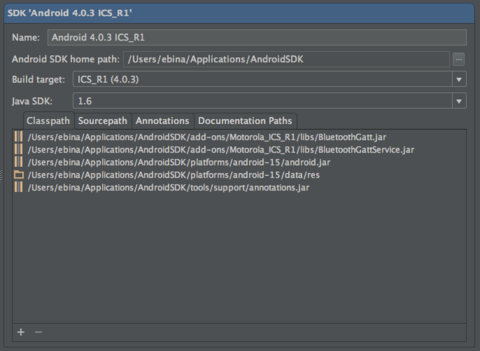
次に、JAR の参照順序を変更する必要があります。BluetoothGatt.jar を1番目、2番目に BluetoothGattService.jar が読み込まれ、その後に android.jar が読み込まれるようにします。
これは、android.jar に入っている同名のクラスよりもを BluetoothGatt.jar などに入っているクラスが優先して読み込まれるようにするためのようです。黒い!
ぼくは InteliJ を使っているので、Project Structure の Platform Settings の SDK で、元々先頭の方に入ってた android.jar などのパスを覚えておいた上で削除して、追加しなおしました。

Eclipseの場合は、android.jar annotations.jar など、Android SDK由来のjarを削除した上で、Android Tools の Fix Project Properties を使えばいいそうです。
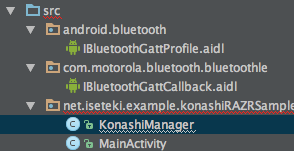
次に、SDK の libs/BLE_profile.zip を展開して aidl ファイルを、src ツリーに登録します。

この状態で一度ビルドすれば、interface が作成されます。
Bluetooth LE の実装
BluetoothAdapter で機器を検索
Android 標準の BluetoothAdapter クラスを使って機器を検索します。機器が見つかれば ACTION_FOUND のブロードキャスト、Service が見つかれば ACTION_GATT が飛んでくるので、フィルタを作成しておきます。
// #1. ACTION_FOUND(デバイス発見) / ACTION_GATT(GATT Service発見) を受信する
// BroadcastReceiver を作る
mFoundReceiver = new FoundReceiver();
IntentFilter filter = new IntentFilter();
filter.addAction(BluetoothDevice.ACTION_FOUND);
filter.addAction(BluetoothDevice.ACTION_GATT);
getContext().registerReceiver(mFoundReceiver, filter);

// #2. デバイスを検索する
mBluetoothAdapter.startDiscovery();
Service の検索
ACTION_FOUND ブロードキャストがきたら、そのデバイスに対して getGattServices を実行します。
Service の取得処理が行われ、ACTION_GATT ブロードキャストがくるので、Extras から EXTRA_GATT を取得します。
取得された Extra には、UUID と対となる Object Path が入っています。どうやらデバイスとUUIDの組み合わせでパスを作っているらしく、Motorola BLE API ではこの Object Path と UUID を相互変換して目的の Service や Characteristic を見つけることになります。
@Override
public void onReceive(Context context, Intent intent) {
    BluetoothDevice device = (BluetoothDevice) intent.getExtras().get(BluetoothDevice.EXTRA_DEVICE);

    String action = intent.getAction();
    Log.d("BLE", "FoundReceiver: "+action);

    if (action.equals(BluetoothDevice.ACTION_FOUND)) {
        // #3. デバイスが見つかったら、そのデバイスに対してGATT Serviceを要求する
        device.getGattServices(KONASHI_SERVICE_UUID.getUuid());
    }
    else if (action.equals(BluetoothDevice.ACTION_GATT)) {
        // #4. GATT Serviceが見つかったら、Characteristic の Object Path を取得する。
        //     Motorola BLE API はService/Characteristics を UUID では直接処理できず、
        //     Object Path との相互変換が必要。
        String[] pathArray = intent.getStringArrayExtra(BluetoothDevice.EXTRA_GATT);
        if (pathArray != null && pathArray.length > 0) {
            onFoundDevice(device, pathArray[0]);
        }
    }
}
BluetoothGattService の作成と値受信の設定
受信した Service の Object Path を使用して、BluetoothGattService のインスタンスを作成します。
このインスタンスが作成された所で接続とCharacteristic の検索が自動的に行われます。
第4引数には、aidl ファイルから作成された IBluetoothGattProfile.Stub の実装を渡します。InteliJ を使ってる場合、この第4引数の文法エラーを指摘されますが無視して進めてOKです。
また、値の変化のNotifyを受け取るには registerWatcher をコールしておく必要があります。
public void connect(BluetoothDevice device, String objectPath) {
    Log.d("BLE", "Connect");
    mObjectPath = objectPath;
    mDevice = device;
    // #5. Profile を指定して Service のインスタンスを作成する。
    //     インスタンスを作成すると、自動的にCharacterisitcs の列挙が始まる。
    //     InteliJ ではこの行にエラーが出るけど普通にビルド通るので無視してOK
    mService = new BluetoothGattService(mDevice, KONASHI_SERVICE_UUID, mObjectPath, new KonashiProfile());
    try {
        // #6. Notify受信のコールバックを有効にする
        mService.registerWatcher();
    } catch (Exception e) {
        e.printStackTrace();
    }
}
BluetoothGattProfile の処理
以後、BluetoothGattProfile の実装に Service からのコールバックが通知されてきます。
まず、Service から Characterisitcs が受信されると onDiscoverCharacteristicsResult 通知されます。
ここで、getCharacteristcs() を呼び出すと、Characteristic の Object Path のリストが得られます。
Object Path をそれぞれ getCharacteristicUuid で UUID に変換して、目的の Characteristic を発見します。
1つの Profile インスタンスで複数のデバイスを扱うようにしたい場合は、第1引数の path が Service の Object Path なので、これで分岐すればよいでしょう。
Characteristc からの通知を有効にする場合は、 setCharacteristicClientConf で Object Path に対して ((1 << 8) & 0xff00) を指定します。逆に無効にする場合は ((0 << 8) & 0xff00) を指定します。なんでこれは定数切られてないのかが不思議で仕方ありません。
public void onDiscoverCharacteristicsResult(String path, boolean result) throws RemoteException {
    Log.d("BLE", "onDiscoverCharacteristicsResult path: " + path + " / result:" + (result ? "T" : "F"));

    // #7. Characteristic の検索が完了するとこのメソッドが呼ばれる

    for (String c : mService.getCharacteristics()) {
        Log.d("BLE", "Chara: " + c);
        // #8. Characteristic は Object Path の形式で渡されるため、
        //     UUID との比較のため、getCharacteristicUuid を実行して比較する。
        //     今回は UUID_PIO_INPUT_VALUE_STATE を監視して、PIO 0 のタクトスイッチを監視します
        if (mService.getCharacteristicUuid(c).getUuid().equals(PIO_INPUT_VALUE_STATE_UUID.getUuid())) {
            try {
                Log.d("BLE", "setCharacteristicClientConf: " + c);
                // #9. Notify を有効にする (なんでこれ定数切ってないんだろう...)
                mService.setCharacteristicClientConf(c, ((1 << 8) & 0xff00));
            } catch (Exception e) {
                e.printStackTrace();
            }
        }
    }

    Intent i = new Intent(ACTION_CONNECT_COMPLETED);
    getContext().sendBroadcast(i);
}
値の変化の Notify は onValueChanged に飛んできます。今回はBoradcastを投げて UI に通知しました。
@Override
public void onValueChanged(String path, String value) throws RemoteException {
    Log.d("BLE", "onValueChanged path: " + path + " / value:" + value);

    // #10. 値変更のNotify が飛んでくるとこのメソッドが呼ばれる

    Intent i = new Intent(ACTION_VALUE_CHANGED);
    i.putExtra(EXTRA_VALUE, value);
    getContext().sendBroadcast(i);
}
このプログラムの全体像
一応このプログラムの全体をおいておきます。一応 Konashi の SDK っぽいの作ろうとしたけど途中で挫折したんで gist でおいときます。